
搭建 Laravel Sail 开发环境 – Windows
说明
本文将一步步带你在 Windows 10 搭建 Laravel Sail 开发环境。
请遵循步骤进行操作,如遇问题在文章下方提问。
一、升级系统
Laravel Sail 要求支持 WSL 2 的 Windows 10 系统。
查看系统版本: 可以使用 winver 命令
按住win+R,在运行窗口输入winver, 点回车。
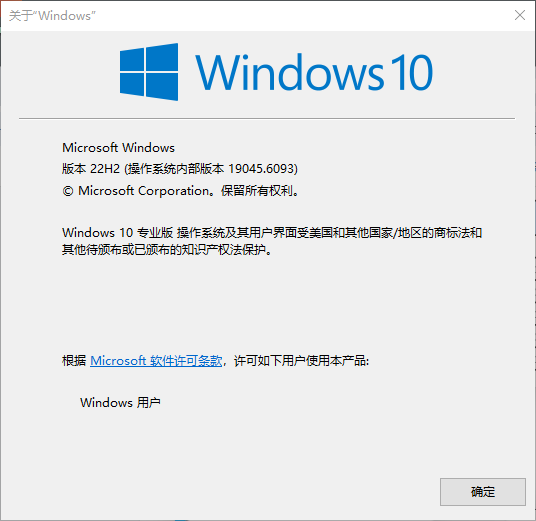
弹出窗口查看版本22H2,建议升级到 20H2 或者以上。
参考 Windows 10 release information ,版本的发布时间大于 1909 即可。
开启WSL
右击 此电脑 图标,点击 属性 打开设置界面,搜索 Windows 功能 窗口:
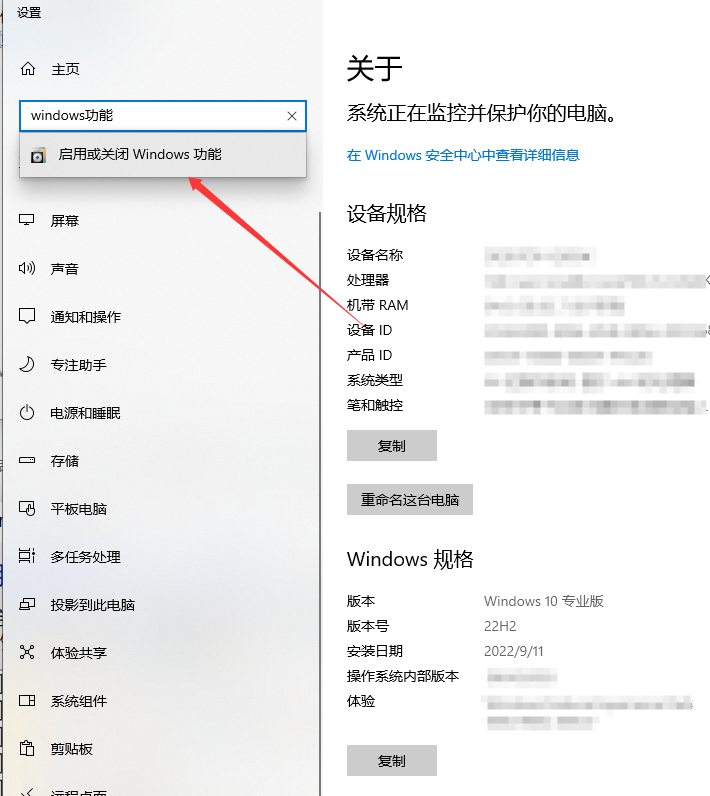
点击 启用或关闭Windows功能,勾选下图选项:

至此系统准备就绪。
二、安装 Windows Terminal
为了更好地访问 Windows 的子系统,推荐使用 Windows Terminal 作为命令行工具,非常好用。
打开微软商店,搜索关键字 Windows Terminal ,在搜索结果中点击安装即可。
三、下载 VSCode
打开 code.visualstudio.com/download ,选择 Windows 版本的 VSCode 进行下载并安装。(这步骤可省略)
四、安装 Ubuntu
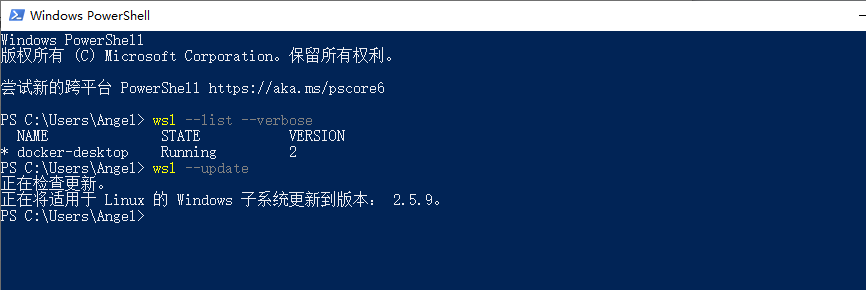
安装前,先查看WSL的版本,输入 wsl — update 更新到最新版,确保在2以上的版本。
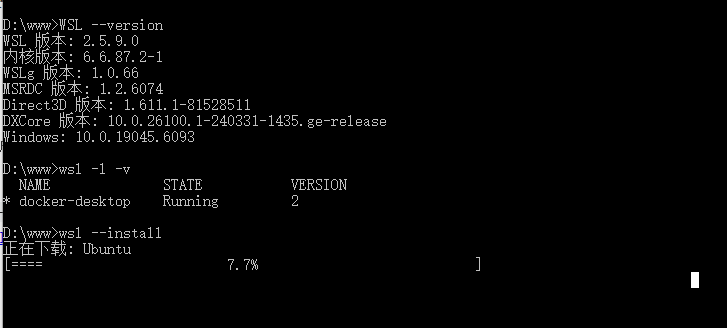
然后,以管理员模式打开 PowerShell 或 Windows 命令提示符,输入 wsl –install 命令
wsl --install
此命令将启用运行 WSL 所需的功能并安装 Linux 的 Ubuntu 发行版。
安装 WSL 后,您需要为新安装的 Linux 发行版创建用户帐户和密码。
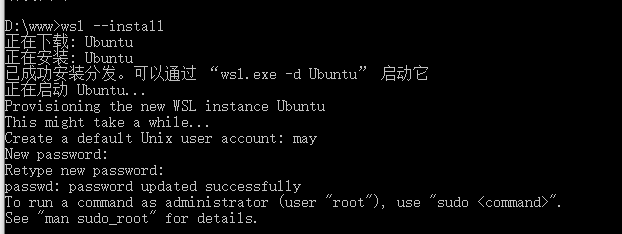
然后重新启动计算机。
五、安装 Docker Desktop
1. 下载并安装
前往 Docker 官网下载 Docker Desktop ,下载完成后点击安装包安装,一直下一步即可。
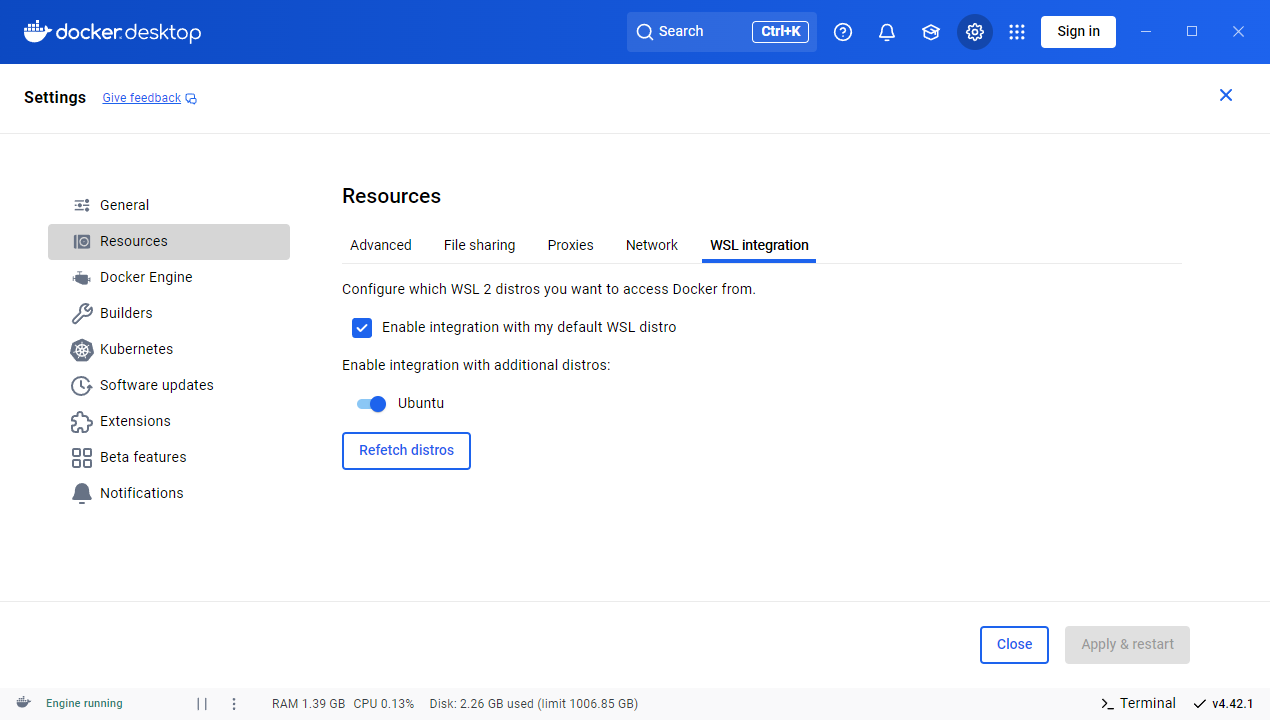
2. 开启 WSL2 模式
安装完成后运行程序,进入配置页面,开启 WSL2 模式:

同时这个地方也需要设置,选择我们上一步安装的 Ubuntu 系统,然后点击右下方的按钮应用修改:
3. Docker Hub 镜像加速(重要)
国内从 Docker Hub 拉取镜像有时会遇到困难,此时可以配置镜像加速器。
目前我收集到可用的dockers镜像,如果失效,请自己重新搜索
,
"registry-mirrors": [
"https://docker.xuanyuan.me",
"https://docker.1ms.run",
"https://docker.m.daocloud.io"
]
进入 Docker Engine 里,粘贴上面的代码,如下:
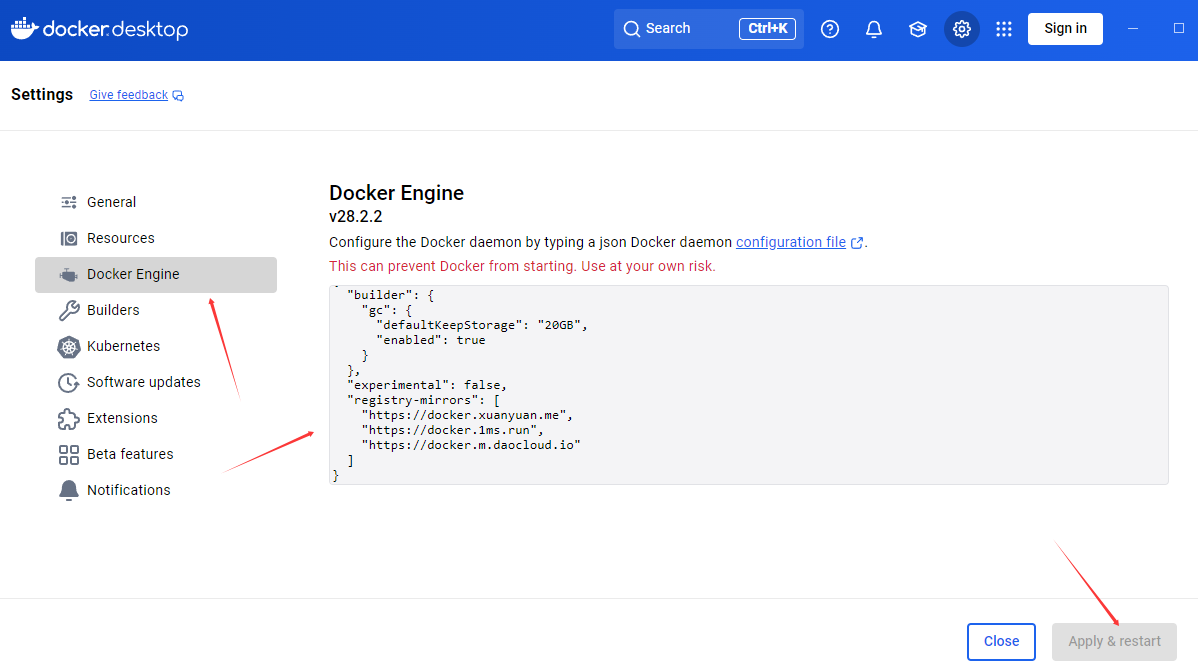
最后点击 Apply & Restart ,进行重启。
六、创建测试项目
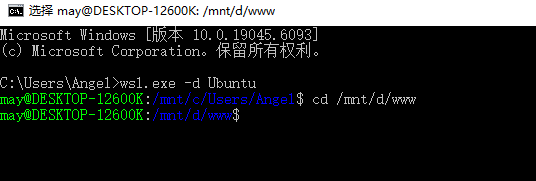
进入Linux系统: 可以打开我们上面下载的 Windows Terminal 命令行,在下拉选项选Ubuntu。也可以在系统菜单里面找到刚安装的Ubuntu系统图标,双击进入。也可以cmd里面运行
wsl.exe -d Ubuntu
注意要以管理员的身份进行系统。
Ubuntu 作为 Windows 子系统,可以访问到主系统下的硬盘。
为了方便管理代码,我在 D盘下创建了 www 目录
进入此目录后,使用以下命令进行创建一个测试的 Laravel 项目:
curl -s https://laravel.build/example-app | bash
建议先建立一个测试项目来练手。
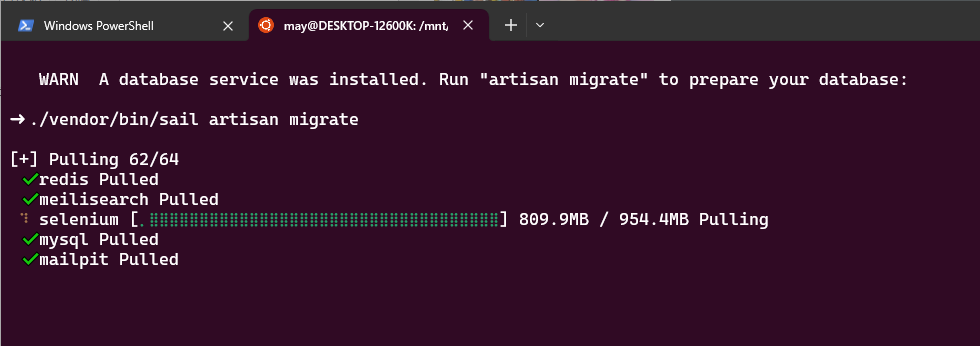
默认安装redis, meillisearch, selenium, mysql, mailpit
安装的过程,因为需要很多的软件包会卡,会比较慢。 如果国外源报错了,可以按下图更换为国内源
(基于ubuntu24版本的更改)
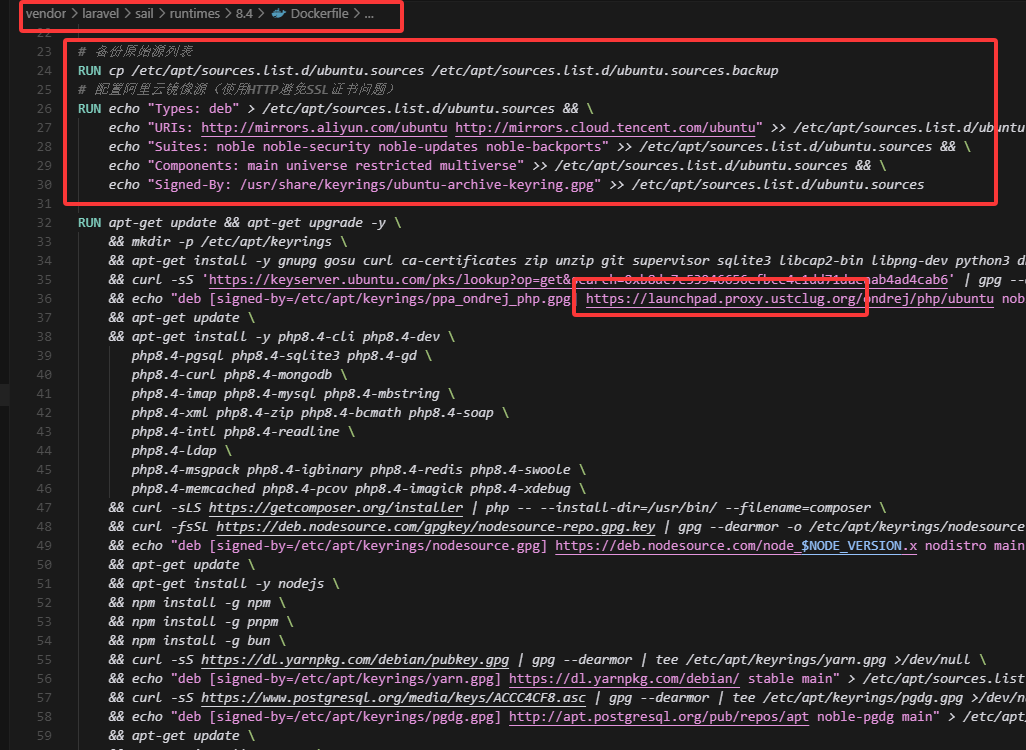
执行完 curl –s https://laravel.build/example-app | bash, 基本会生成项目文件,在项目文件vendor/laravel/sail/runtimes/8.4下面找到dockfile:
# 备份原始源列表

RUN cp /etc/apt/sources.list.d/ubuntu.sources /etc/apt/sources.list.d/ubuntu.sources.backup

# 配置阿里云镜像源(使用HTTP避免SSL证书问题)

RUN echo "Types: deb" > /etc/apt/sources.list.d/ubuntu.sources && \
    echo "URIs: http://mirrors.aliyun.com/ubuntu http://mirrors.cloud.tencent.com/ubuntu" >> /etc/apt/sources.list.d/ubuntu.sources && \
    echo "Suites: noble noble-security noble-updates noble-backports" >> /etc/apt/sources.list.d/ubuntu.sources && \
    echo "Components: main universe restricted multiverse" >> /etc/apt/sources.list.d/ubuntu.sources && \
    echo "Signed-By:/usr/share/keyrings/ubuntu-archive-keyring.gpg">>/etc/apt/sources.list.d/ubuntu.sources
- noble – 主要软件包
- noble-updates – 更新软件包
- noble-backports – 向后移植软件包
- noble-security – 安全更新
其他备用的国内镜像:
测试过程中,华为云的镜像速度最快
复制上面的代码写入RUN apt-get update前面可以更换为国内镜像源来执行,如图
Ubuntu PPA 加速
在文件中,搜索并将:http://ppa.launchpad.net 替换为:
https://launchpad.proxy.ustclug.org
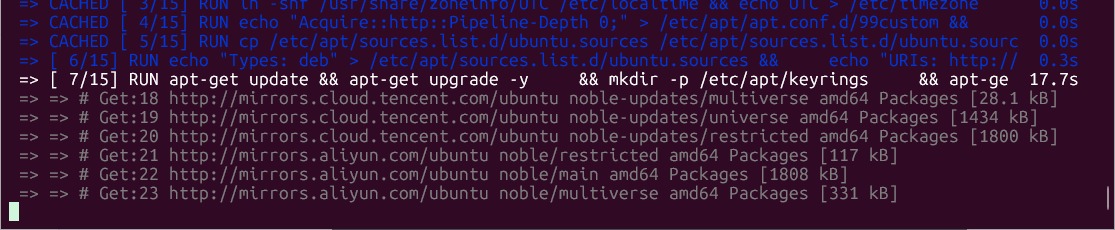
执行后,如图:

这样基本可以解决国外源卡死的问题。
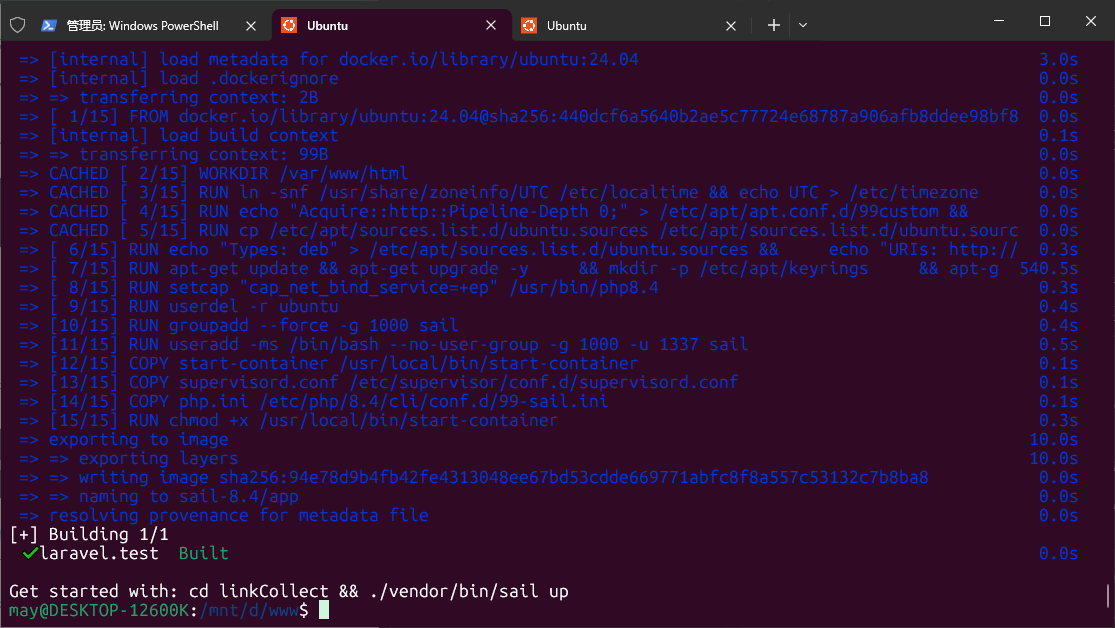
执行到这里,基本上镜像环境没什么问题了,我们接下来执行下面命令来构建我们的容器
./vendor/bin/sail up
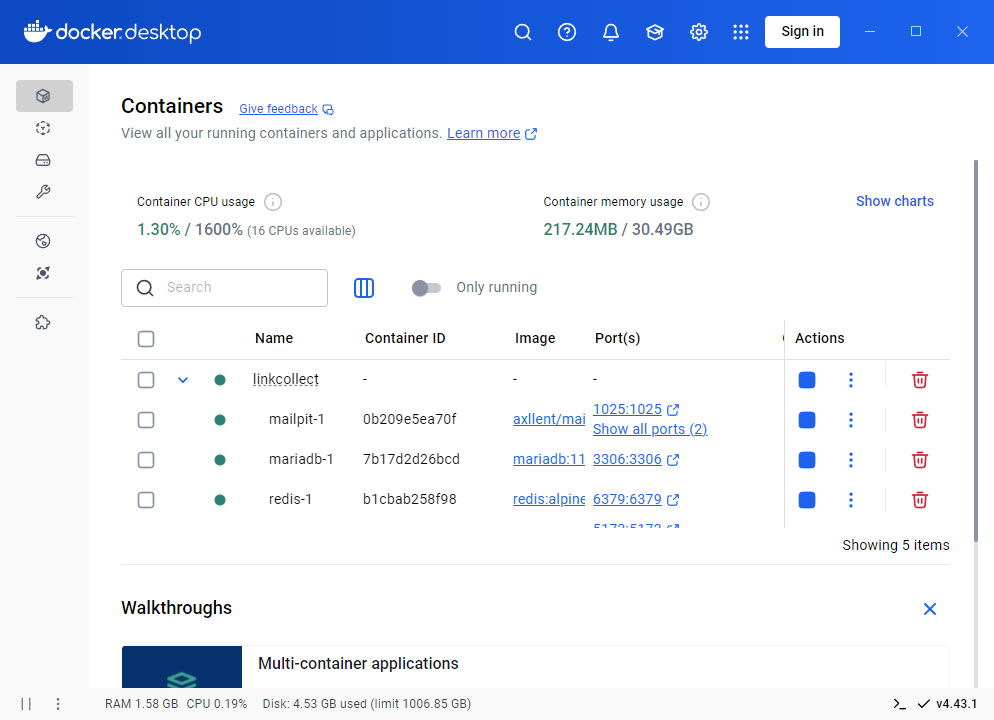
执行完后,就可以在docker看到我们刚刚命令执行构建的容器
./vendor/bin/sail artisan migrate最后,执行上面的命令,在浏览器输入localhost就可以看见我们的项目了。
七、Sail快速上手
Sail 命令
Sail 的大部分操作都是通过可执行文件 ./vendor/bin/sail 来执行。首先需要设置快捷命令:
alias sail='bash vendor/bin/sail' 临时生效方案(仅当前会话有效)
为了确保这个sail始终可用,可以修改shell 配置文件,比如 ~/.zshrc 或 ~/.bashrc,
alias sail='sh $([ -f sail ] && echo sail || echo vendor/bin/sail)'
然后重新启动shell。
docker-compose 容器命令:
sail up //启动容器
sail up -d //启动容器,在后台执行
sail stop //停止容器
sail restart //重启容器
sail ps //查看项目所有容器的状态
Artisan 命令:
sail artisan … //执行 Artisan 命令
sail artisan queue:work
PHP 命令:
sail php … //执行一个PHP脚本
sail php -v
Composer 命令:
sail composer … //执行一个Composer 命令
sail composer require laravel/sanctum
Node 命令:
sail node … //执行一个Node 命令
sail node –version
NPM 命令:
sail npm … //执行一个npm命令
sail npx //执行一个npx 命令
sail npm run prod
PNPM 命令:
sail pnpm … //执行一个pnpm命令
sail pnpx //执行一个pnpx命令
sail pnpm run prod
Yarn Commands:
sail yarn … //执行一个Yarn命令
sail yarn run prod
Bun Commands:
sail bun … //执行一个bun命令
sail bunx //执行一个bunx命令
sail bun run prod
Database 数据库命令:
sail mysql Start a MySQL CLI session within the ‘mysql’ container
sail mariadb Start a MySQL CLI session within the ‘mariadb’ container
sail psql Start a PostgreSQL CLI session within the ‘pgsql’ container
sail mongodb Start a Mongo Shell session within the ‘mongodb’ container
sail redis Start a Redis CLI session within the ‘redis’ container
sail valkey Start a Valkey CLI session within the ‘valkey’ container
Debugging:
sail debug … Run an Artisan command in debug mode
sail debug queue:work
Running Tests:
sail test Run the PHPUnit tests via the Artisan test command
sail phpunit … Run PHPUnit
sail pest … Run Pest
sail pint … Run Pint
sail dusk Run the Dusk tests (Requires the laravel/dusk package)
sail dusk:fails Re-run previously failed Dusk tests (Requires the laravel/dusk package)
Container CLI:
sail shell Start a shell session within the application container
sail bash Alias for ‘sail shell’
sail root-shell Start a root shell session within the application container
sail root-bash Alias for ‘sail root-shell’
sail tinker Start a new Laravel Tinker session
Sharing:
sail share Share the application publicly via a temporary URL
sail open Open the site in your browser
Binaries:
sail bin … Run Composer binary scripts from the vendor/bin directory
sail run … Run a command within the application container
Customization:
sail artisan sail:publish Publish the Sail configuration files
sail build –no-cache Rebuild all of the Sail containers
掌握了sail的命令,基本不需要我们再进行容器去操作,非常的方便。